If you’ve got your application prepped and eager to containerize it but find yourself new to Docker and unsure how to get started, then docker init is precisely what you need.
docker init accelerates the process of containerizing an application by generating essential docker files such as .dockerignore, Dockerfile, compose.yaml and README.Docker.md tailored to the application needs. These files are required to build the docker image and run the application in containers.
Usage:
docker init
The latest release of docker init supports ASP.NET, Go, Java, Node.js, PHP with Apache, Python, Rust, and generic projects.
Using docker init to initialize a project not only saves time and effort, but also adheres to best practices and ensures security by addressing potential vulnerabilities.
In this blog, we will walk through containerizing a simple Python Flask application using the utility. Alternatively, you can choose a project using a different supported programming language of your choice.
Prerequisites
- You will need Docker Desktop version 4.26.1 or higher for this task. Visit the official Docker documentation for installation instructions.
- You should have some familiarity with Python. If you are new refer to the Flask documentation here to grasp the basics.
Create a Sample Python Application
In this example, we will create and containerize a simple Hello World! Python Flask application.
We’ll create two files: app.py for our Python Flask code and requirements.txt to specify the dependencies, with Flask itself being the only requirement. Our application will run on port 5000, utilizing the latest version of Flask (which is 3.0.3 as of this writing).
app.py:
from flask import Flask

app = Flask(__name__)

@app.route("/")
def hello_world():
    return "<p>Hello, World!</p>"

if __name__ == "__main__":
    app.run(debug=True, host="0.0.0.0", port=5000)
requirements.txt:
Flask==3.0.3
Use docker init to initialize
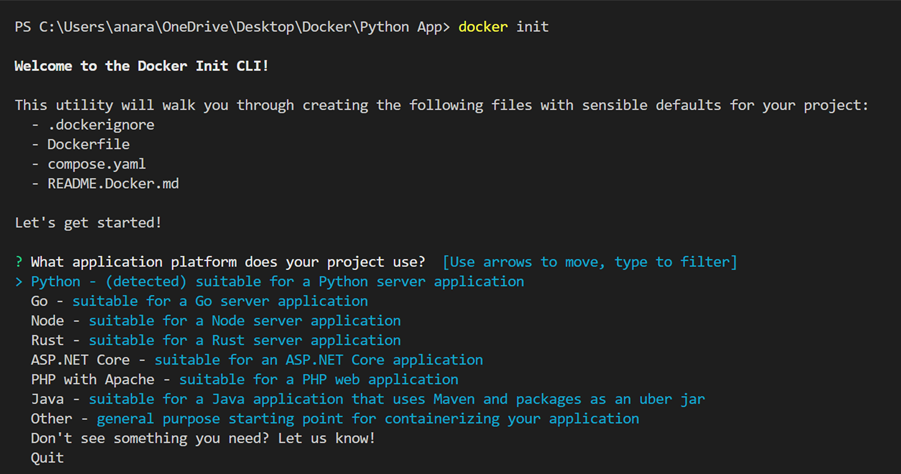
1. Begin by running the docker init command in a terminal inside the project directory. You will be presented with a welcome message along with a list of files that will be generated by the utility.
2. Next, select the application platform used by the project. The auto detected platform is selected by default, which in this example is Python. To choose a different platform, use the arrow keys to navigate up and down. Again, for this demonstration select Python.
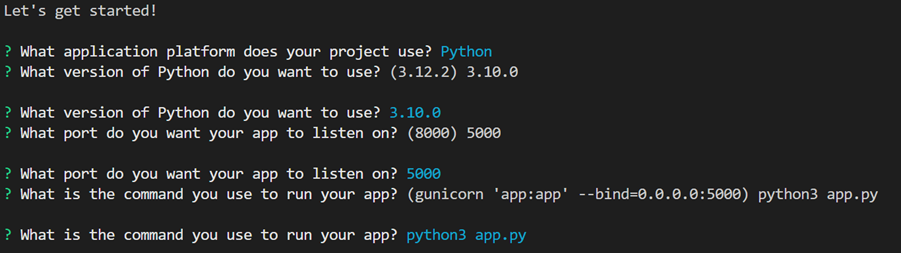
3. After selecting the platform, you will be asked to set the Python version. Enter 3.10.0 for this exercise.
4. Set the port on which the application listens to 5000.
5. Finally, set the command to run the app as python3 app.py.
6. Press enter, and the terminal generates the essential files which are .dockerignore, Dockerfile, compose.yaml, and README.Docker.md.
NOTE: You can customize these files for your project. If a file already exists, you will be presented with a warning to overwrite all files. If docker-compose.yaml exists, docker init can overwrite it. Overwritten files cannot be recovered. To back up, rename or copy the file elsewhere.
Review generated files
Open the Dockerfile, to review the generated content. It sets the Python version specified earlier (i.e. 3.10.0), uses python:3.10.0-slim as the base container image, ensuring a lightweight container image. Additionally, a non-privileged user named appuser will be created, for the application to run as.
The Dockerfile uses a bind mount to mount the requirements.txt file avoiding the need for copying the file into the layer. This is followed by copying the source code into the container. Finally, it includes the instructions to expose the applications on the specified port (i.e. 5000) and command to run the application. You will observe that this Dockerfile adheres to best practices, thereby minimizing security vulnerabilities.
Dockerfile:
# syntax=docker/dockerfile:1

# Comments are provided throughout this file to help you get started.
# If you need more help, visit the Dockerfile reference guide at
# https://docs.docker.com/go/dockerfile-reference/

# Want to help us make this template better? Share your feedback here: https://forms.gle/ybq9Krt8jtBL3iCk7

ARG PYTHON_VERSION=3.10.0
FROM python:${PYTHON_VERSION}-slim as base

# Prevents Python from writing pyc files.
ENV PYTHONDONTWRITEBYTECODE=1

# Keeps Python from buffering stdout and stderr to avoid situations where
# the application crashes without emitting any logs due to buffering.
ENV PYTHONUNBUFFERED=1

WORKDIR /app

# Create a non-privileged user that the app will run under.
# See https://docs.docker.com/go/dockerfile-user-best-practices/
ARG UID=10001
RUN adduser \
    --disabled-password \
    --gecos "" \
    --home "/nonexistent" \
    --shell "/sbin/nologin" \
    --no-create-home \
    --uid "${UID}" \
    appuser

# Download dependencies as a separate step to take advantage of Docker's caching.
# Leverage a cache mount to /root/.cache/pip to speed up subsequent builds.
# Leverage a bind mount to requirements.txt to avoid having to copy them into
# into this layer.
RUN --mount=type=cache,target=/root/.cache/pip \
    --mount=type=bind,source=requirements.txt,target=requirements.txt \
    python -m pip install -r requirements.txt

# Switch to the non-privileged user to run the application.
USER appuser

# Copy the source code into the container.
COPY . .

# Expose the port that the application listens on.
EXPOSE 5000

# Run the application.
CMD python3 app.py
Similarly, on reviewing the compose.yaml file, you will find that it specifies that the build context is the current directory. Context is a path where the Dockerfile resides. Additionally, it specifies the port mapping, which enables accessing the application using port 5000 of the host.
compose.yaml:
services:
  server:
    build:
      context: .
    ports:
      - 5000:5000
The README.Docker.md will provide instructions on building and running your application.
Build and Run the Containerized Application
To build the docker image for the Python application, use the following command:
docker-compose up --build
This instructs docker compose to build the container images and start the containers as defined in compose.yml.
Once the build is ready, you can use the link provided on your terminal to open it in the browser. In this example, it is:
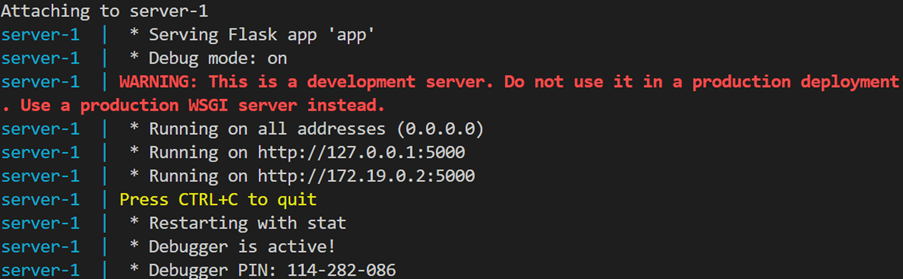
You should see a “Hello, World!” page in the browser.

Key Points
In this blog, we have demonstrated the process of initializing and containerizing a Python Flask application with just two commands: “docker init” and “docker compose up –build“. The docker init command generates essential Docker-related files for your project adhering to best practices which are then used to build the image and run the container.
It’s worth noting that while docker init offers convenience, its suitability may vary across projects. For the simple Python application demonstrated here, no adjustments were necessary. However, complex projects may require careful consideration and customization to certain aspects such as dependencies, configuration, and security.
By Deepthi Narayan