Rakuten Cloud Native Storage by Rakuten Symphony, is an enterprise-grade advanced storage and data management solution, that was previously known as Robin CNS. It is a CSI-compliant block storage solution that seamlessly integrates with Kubernetes-native administrative tools such as kubectl, Helm Charts, and Operators through standard APIs, CLI, and easy-to-use GUI. It seamlessly operates on-premises and integrates with any of your cloud service providers.
In this blog/guide, the below topics will be covered:
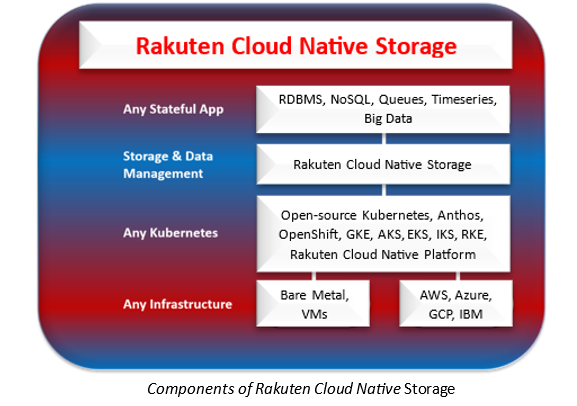
Rakuten Cloud Native Storage Components
Installation Prerequisites
Various options to install Rakuten Cloud Native Storage on GKE
Installation of Rakuten Cloud Native Storage on GKE
Rakuten Cloud Native Storage Components
Rakuten Cloud Native Storage seamlessly bridges the gap between on-premises infrastructure and cloud environments, utilizing your existing disks while effortlessly integrating with leading cloud platforms like GCP, AWS, Azure, and IBM. This hybrid approach empowers organizations with flexible deployment options.
Compatible with a wide array of Kubernetes distributions including IBM Cloud Kubernetes Services, Anthos, RedHat OpenShift, GKE, AKS, EKS, and more, Rakuten Cloud Native Storage offers a unified storage solution. Users can seamlessly incorporate its advanced data management capabilities into their existing setups, facilitating streamlined operations across diverse environments.
Designed to cater to the needs of stateful applications, Rakuten Cloud Native Storage supports a variety of database systems including NoSQL, RDBMS, Timeseries, and Big Data, ensuring optimal performance and reliability.
Installation Prerequisites
The following outlines the prerequisites for the installation of Rakuten Cloud Native Storage:
Note: For detailed pre-requisites, kindly refer to docs.robin.io .
Various options to install Rakuten Cloud Native Storage on GKE
When we talk about the installation options, we have three different options for deploying Rakuten Cloud Native Storage on GKE:
Via Google Marketplace Offering
Using Robin Installer command
Using CLI approach (by cloning robin-storage-gke-marketplace.git repository)
In this blog, we will setup Rakuten Cloud Native Storage from scratch via Google Marketplace Offerings.
Installation of Rakuten Cloud Native Storage on GKE
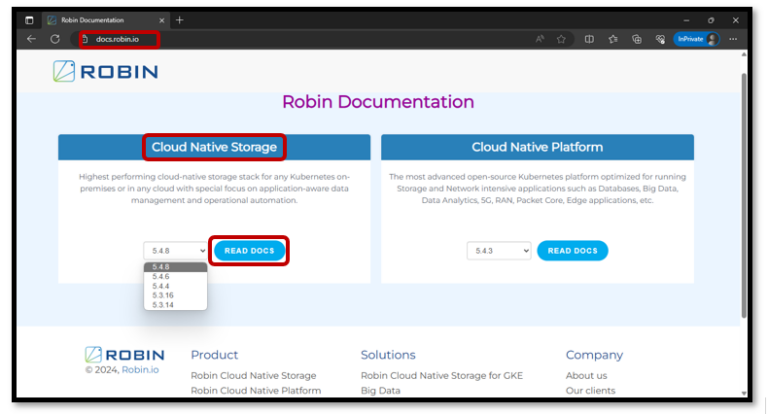
Before we get started, we will explore the official documentation.
Go to docs.robin.io, select the version of our choice, and click on Read Docs under Cloud Native Storage section.
Let’s now explore the documentation.
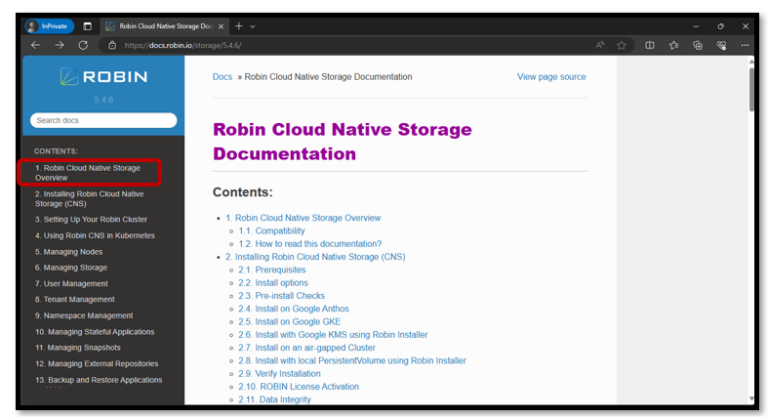
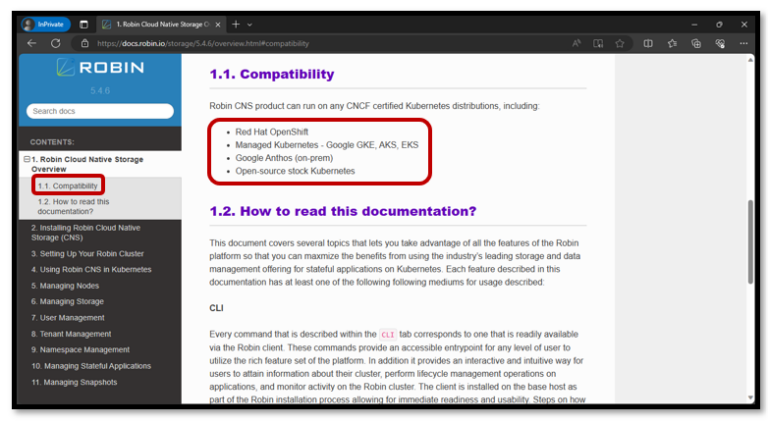
Click on Robin Cloud Native Storage Overview which will provide a high-level understanding of the industry’s leading Storage and Data Management solution for Kubernetes.
As we can see, Rakuten Cloud Native Storage is compatible with RedHat OpenShift, Managed K8s like GKE, AKS and EKS, Google Anthos, and Native K8s.
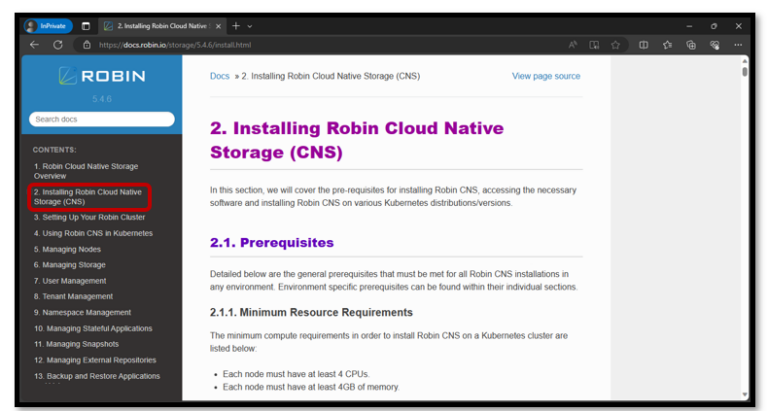
To check the prerequisites and installation options, click on Installing Robin Cloud Native Storage (CNS).
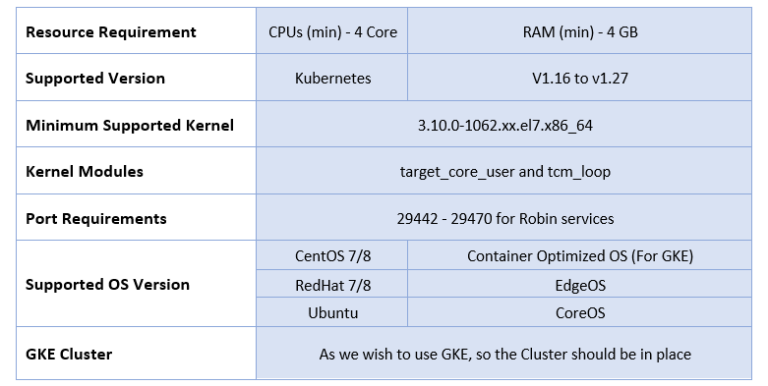
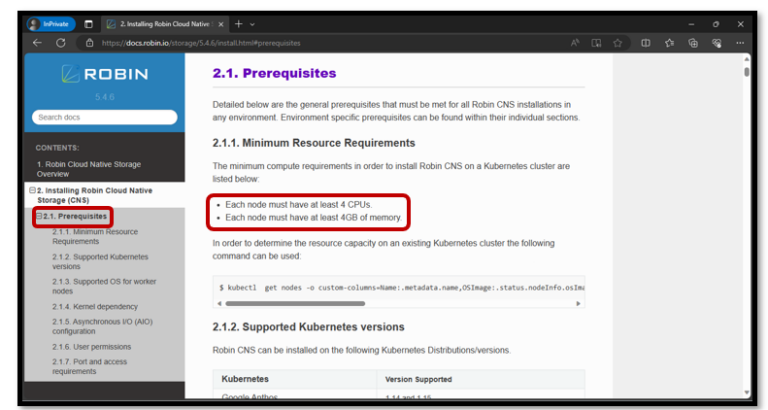
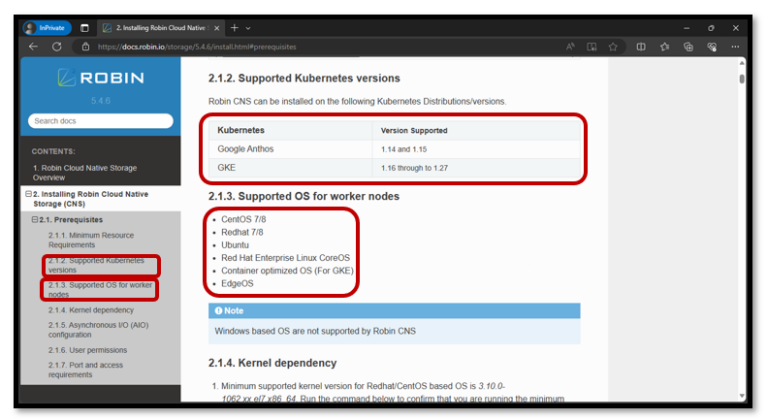
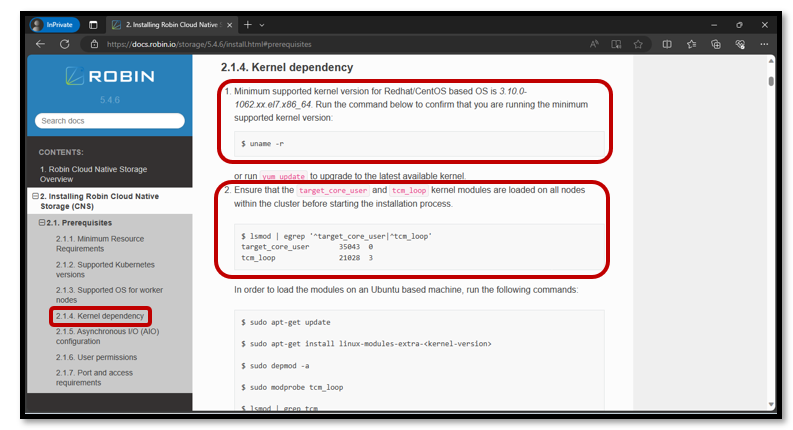
Under the Prerequisites section, we will find information on resource requirements which is minimum of 4 core CPUs and 4GB memory per node, supported K8s versions, supported operating systems, minimum kernel version and required kernel modules which are target_core_user and tcm_loop.
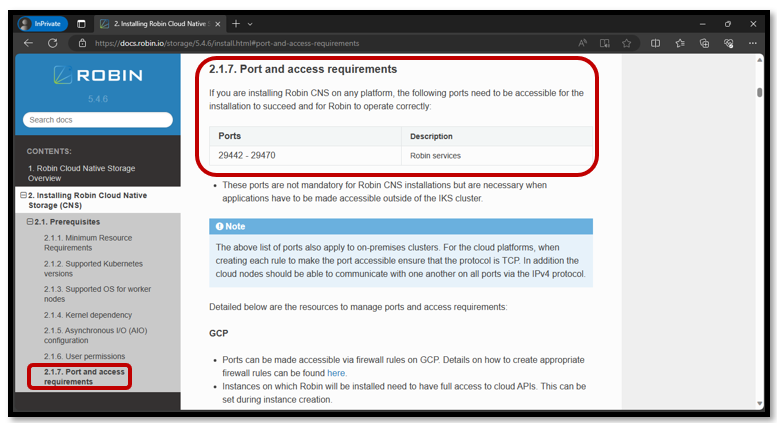
If we further scroll down, we will find the port requirements ranging from 29442 to 29470 for robin services. There are a few more requirements if we are considering CNS for our production ecosystem.
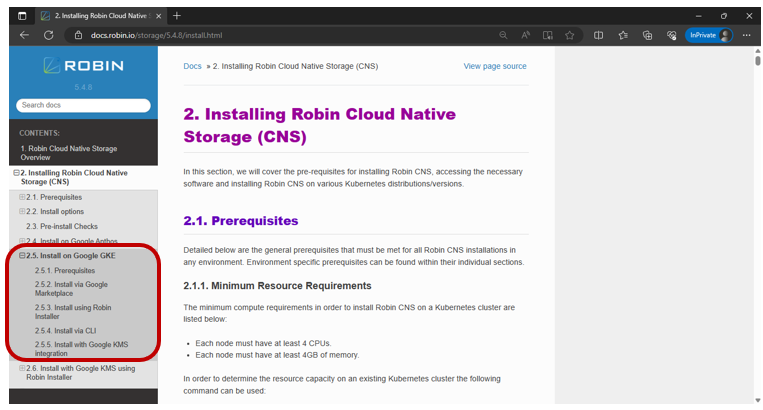
These are the general pre-requisites however, we may refer to docs.robin.io (as shown below) for the pre-requisites specific to GKE.
Now, let us proceed with the setup.
Here, we will be setting up Rakuten Cloud Native Storage on GKE and hence we would be having:
GKE Cluster in place
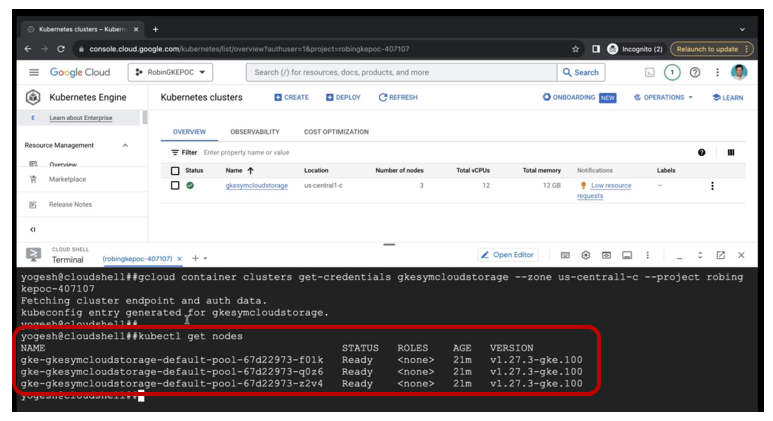
In our case, we have three node GKE cluster that is up and running, and the nodes are in a ready state.
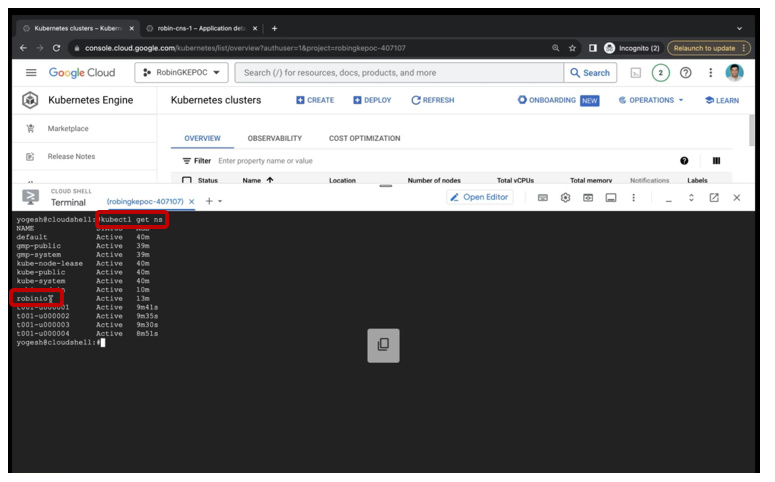
We can also see that the default namespaces are available,
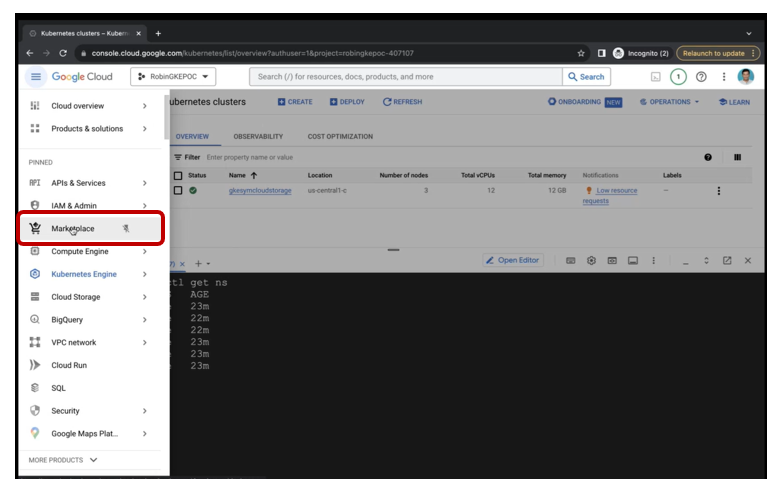
Now, let’s search for Marketplace and open in a new tab.
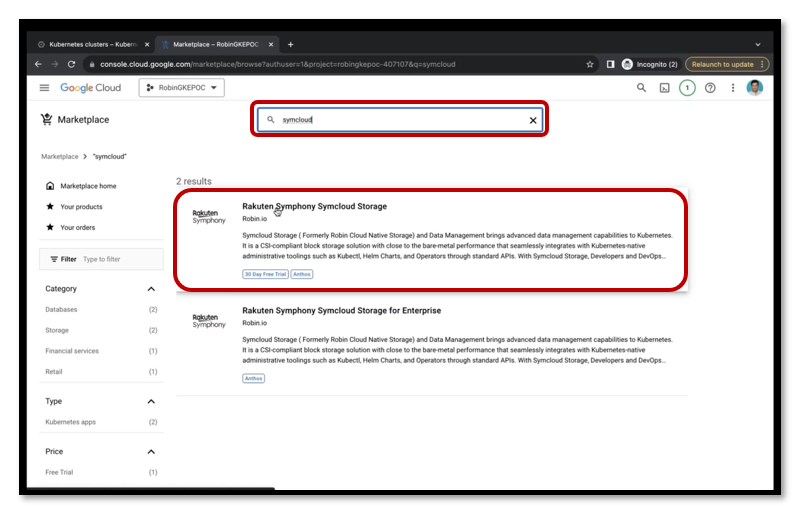
Then, search for Symcloud, and click on Rakuten Symphony Symcloud Storage.
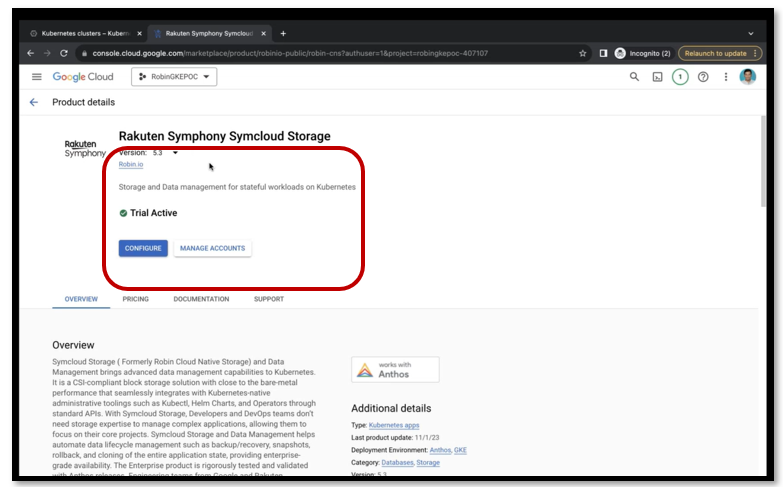
We can see that the current version is 5.3 and we get a free trial period for 30 days. Now, we need to click on CONFIGURE.
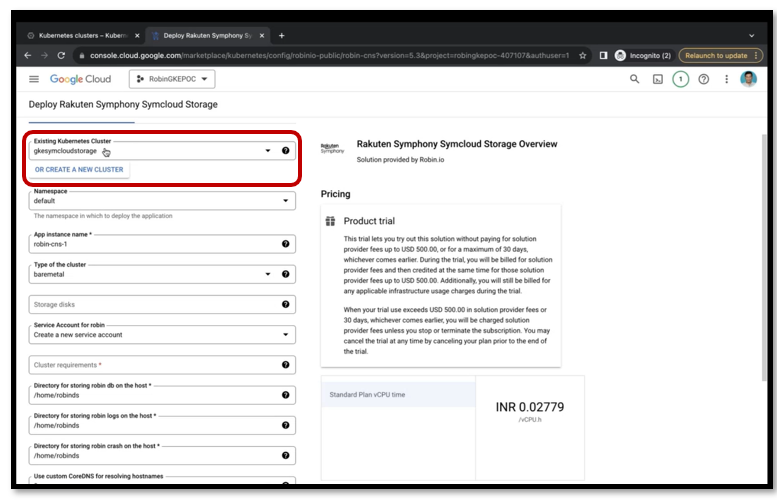
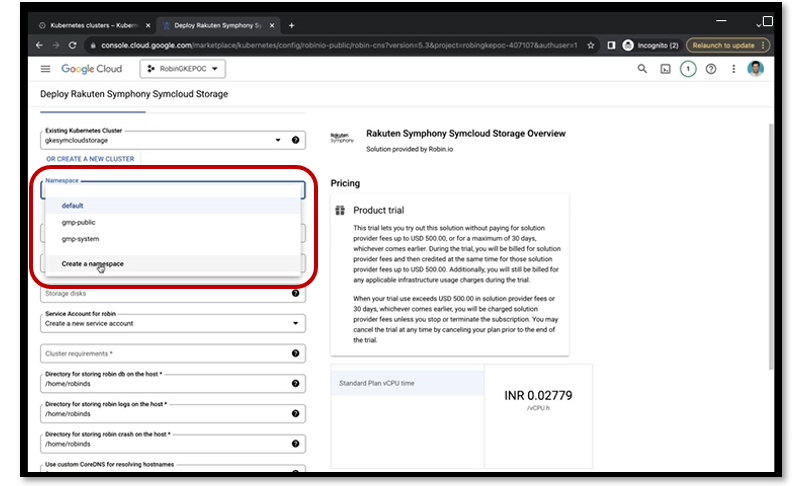
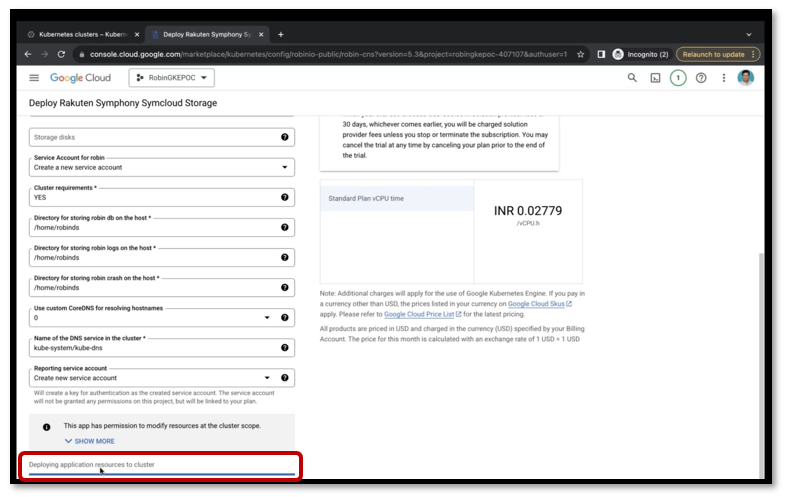
It will open a form to fill out. Here, we will have the option to either use the existing GKE cluster or create a new one. We will use the existing cluster.
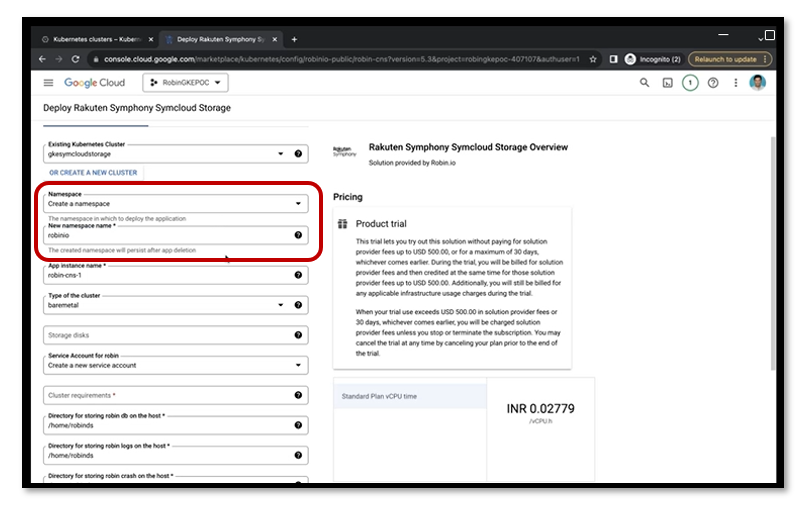
As we are going to use a new namespace, we will click on Create a namespace and give it a name as “robinio”.
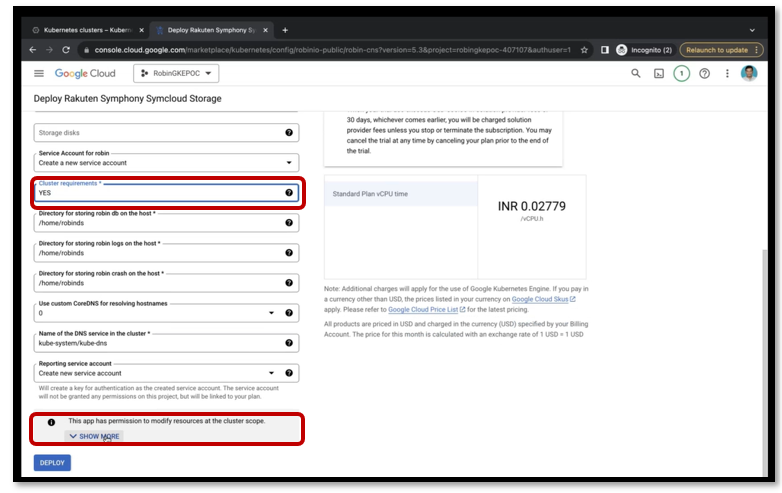
Put Yes under Cluster requirements. We can also see some cluster-level permissions here.
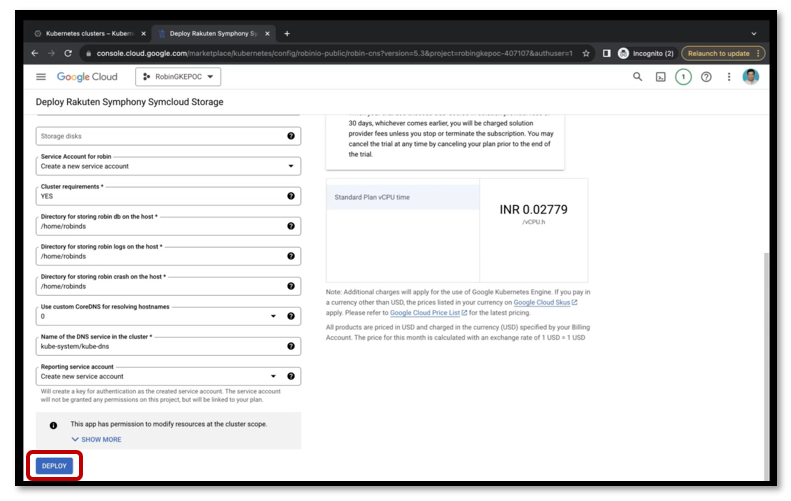
Let’s keep all other things as it is. Now, click on the Deploy option.
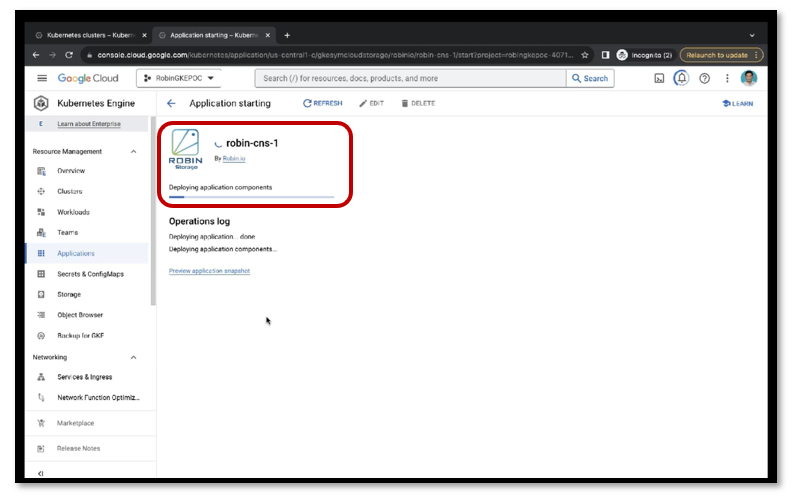
As soon as we click on the Deploy option, it will start deploying the Rakuten Cloud Native Storage software on GKE cluster.
As the deployment progresses, it will switch to our GKE console.
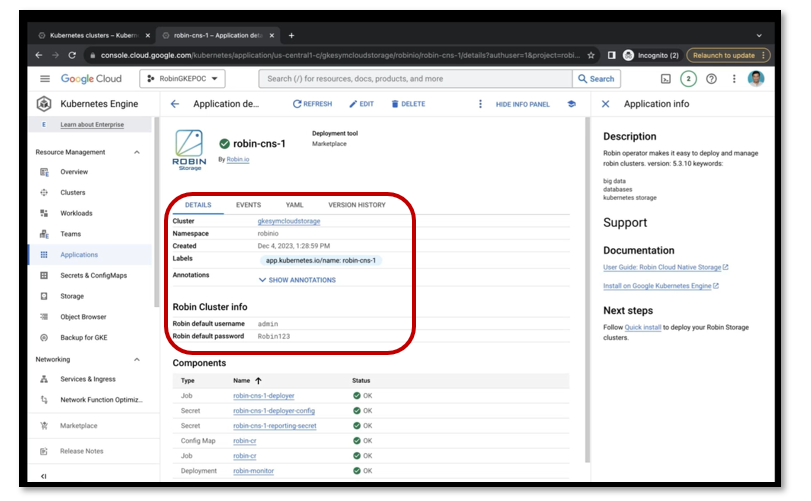
Now, as we can see, the installation has been completed and it shows the cluster details.
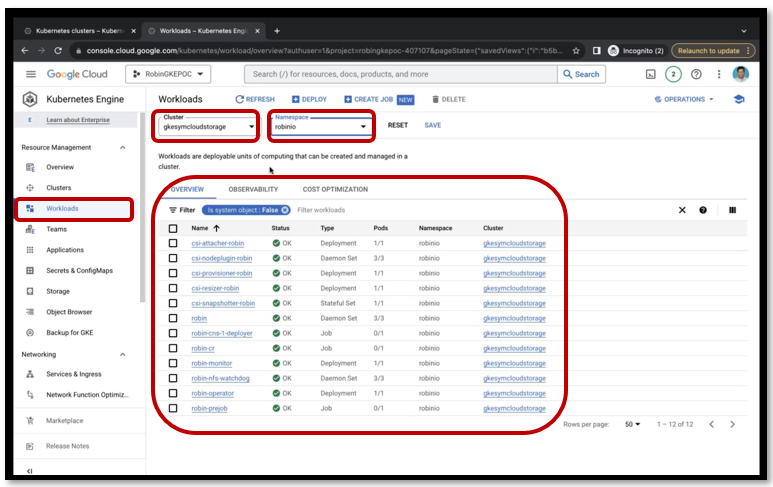
Under Workloads option, if we select the cluster and namespace, it will show all the details.
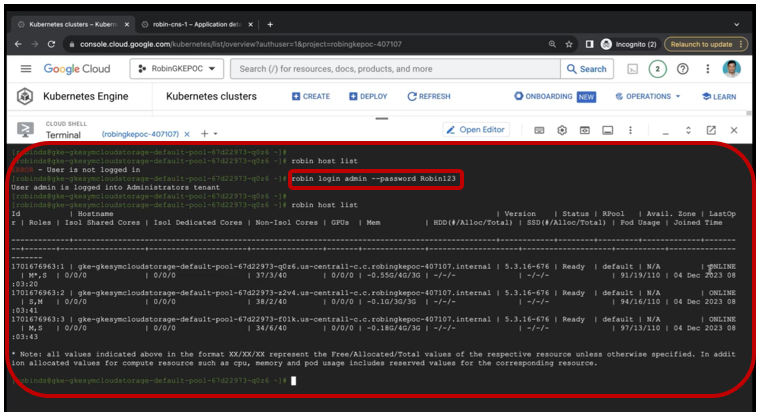
Now, if we go back to the cluster and run kubectl get ns, it will show a namespace robinio.
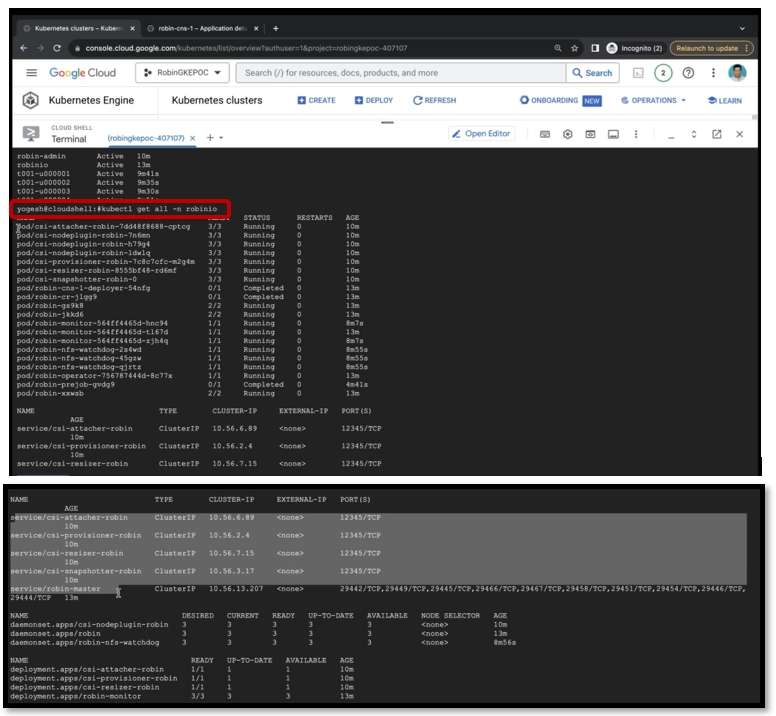
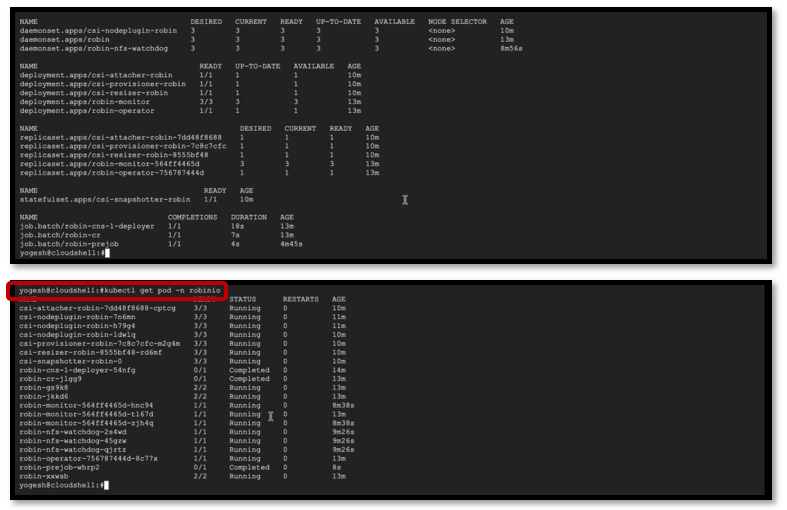
Let’s run kubectl get all -n robinio, it will show everything that Rakuten CNS has deployed.
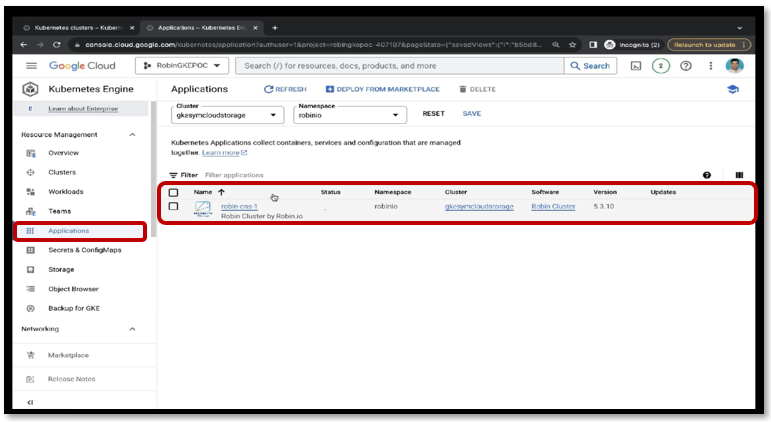
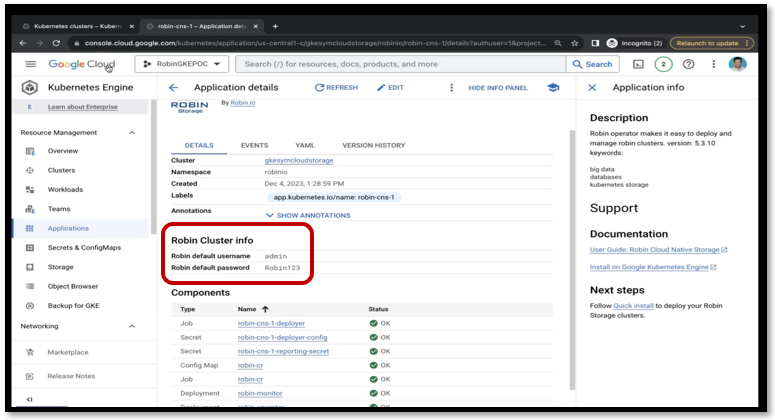
Now, let’s go to the Applications to get our cluster login information.
We can login into our cluster by using the username and password which is shown above.
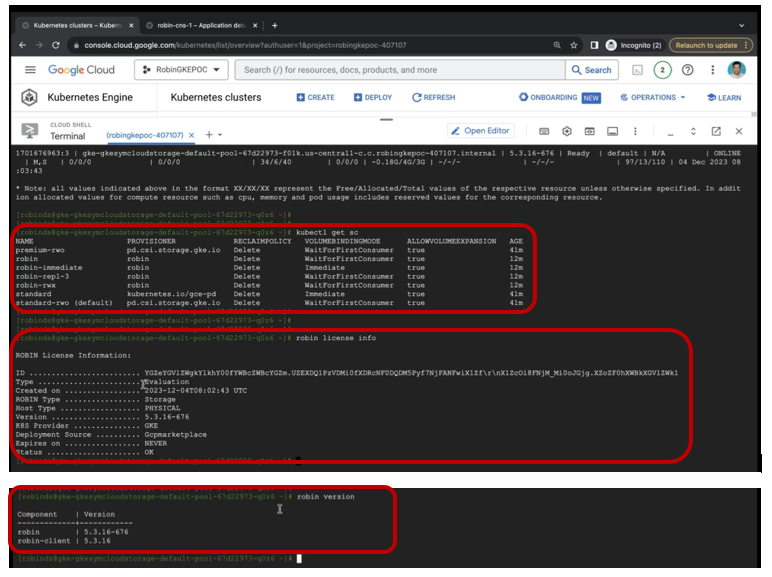
We can also check the Storage Class, license information, and the version of robin cluster/client.
Conclusion
As we conclude this blog/guide, we have delved into the Rakuten Cloud Native Storage ecosystem, covering its overview, essential prerequisites, and a detailed installation process leveraging the Google Marketplace Offering.
We believe this comprehensive blog/guide empowers you to navigate real-world scenarios and elevate your expertise with Rakuten Cloud Native Storage Software.
Symcloud Storage | Installation On Google Kubernetes Engine (GKE)